メインコンテンツへスキップ

ONTAP System ManagerでAutoSupport設定を編集する方法

Views:
119
Visibility:
Public
Votes:
0
Category:
ontap-system-manager
Specialty:
om
Last Updated:

Color_Def.png

規定のコンテンツブロック内にのみテキストを追加してください。ソルブループコンテンツの作成の詳細については、こちら をクリックしてください。

環境

  • ONTAP System Manager 9.7+
  • AutoSupport

概要

この記事では、ONTAP 9.7+のONTAP System Manager新しいエクスペリエンスインターフェイスを使用して、クラスタのAutoSupport構成を編集する方法について説明します。

手順

  1. ONTAP System Managerにログインします。
  2. ClusterSettingsにアクセスします。 

msedge_Jk6pAnZRyz.png

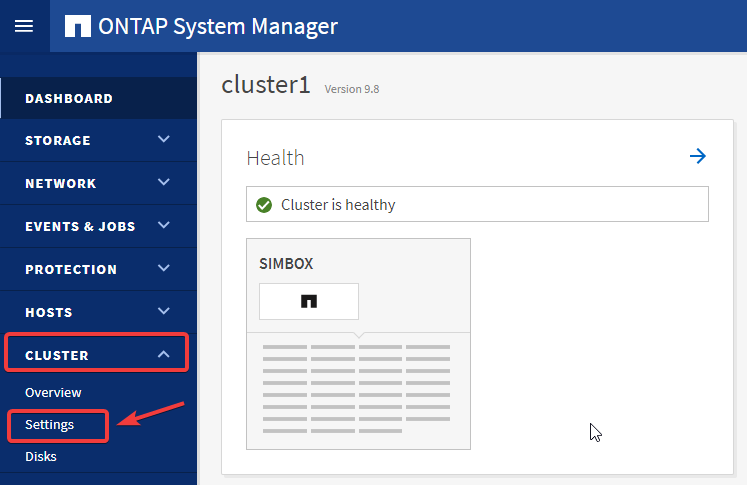
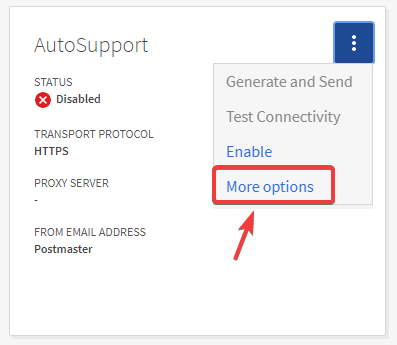
  1. AutoSupportウィジェットのドットメニューを展開します。

msedge_7DLEjSbHCJ.png

  1. クリック 有効にする、次にその他のオプション で詳細を設定します

msedge_KicxpbS33Q.png

  1. ここから、MAIL HOST、PROXY SERVER、EMAIL RECIPIENT、EMAIL SEND FROM を、それぞれのEditボタンで設定できます:

ASUP new experience.PNG

注:

  • 各メールホストごとにポート値を設定するには、メールホスト名の後にコロンとポート番号を指定します。たとえば、mymailhost.example.com:5678のように、5678がメールホストのポートです。
  • SMTPメールサーバーでデフォルトのポート25を使用する場合、ポート番号が指定されていなくても、メールホストアドレスを入力するとポート番号25が自動的に設定されます。

追加情報

追加情報_text

内部情報

内部情報_text

Sign in to view the entire content of this KB article.

New to NetApp?

Learn more about our award-winning Support

NetApp provides no representations or warranties regarding the accuracy or reliability or serviceability of any information or recommendations provided in this publication or with respect to any results that may be obtained by the use of the information or observance of any recommendations provided herein. The information in this document is distributed AS IS and the use of this information or the implementation of any recommendations or techniques herein is a customer's responsibility and depends on the customer's ability to evaluate and integrate them into the customer's operational environment. This document and the information contained herein may be used solely in connection with the NetApp products discussed in this document.